蒙奇日记

自我绑架

晚上做了一场似乎荒诞又真实的梦。

在一栋正在修建的写字楼里,电梯已经布置好了并可以正常使用。我和一群人在电梯里缓缓上行,突然电梯门开了,应该是中途有人乘坐。然而电梯门打开之后,映入眼帘的却是一位老太太因为脚卡到破碎的一块墙体里边,不停的往外拔,旁边的老伴也一直在帮他用力,只是因为年纪大了,似乎并没有什么作用。

我看到这一幕,立即就往电梯外走,同时跟电梯里的人说:“咱们去帮帮她吧,那个墙估计很沉,我们一起帮帮她...…”,同时又用手按着点击的闸门,防止它自动关上。

可是任凭我怎么说,那些人好像听不到我说话一样,面无表情。僵持了好长一会,终于有一个人动了,本以为那人是要和我一起,哪知道那人就往前走了一步,推开了我的手,紧接着他按了一下关门键,电梯门缓缓关上,只剩我一个人在电梯外边。

由于受到一些新闻影响,心里不自觉的有一些警惕性,觉得我应该拿手机拍下来整个过程,这样以防万一也好有个证据。可是就我一个人,一只手拿着手机的话,另外一只手就没办法抬起来那水泥墙。

纠结无奈之下,觉得就把手机递给那老大爷,让他拿着手机拍,递过去之后心里也突然愧疚自己怎么能这么看人家,世界上哪有那么多坏人。

由于是实打实的水泥墙,抬的过程是真费力且焦急。以至于没有心思保持自己的警惕。快要抬过去的时候,那大爷突然跟我说:“手机锁屏了,密码多少,要解开才能继续拍”。我这时正一心思抬东西,完全没有想太多,就把密码告诉他了。后来想想自己真蠢。

过了一会,我终于把那老太太的腿拔出来,气喘吁吁的问那大爷要手机的时候,那大爷却说:“你问我要什么手机,我没见你的手机。

”你手机拿的就是我的啊,刚才我让你帮我拍着视频“

”这是我的啊,怎么会是你的,是你的你能解开吗“

说完那大爷就把手机递给我,让我看看能不能解锁,我输入我的密码,发现已经不能解锁,人脸识别也不能用了,这时我才意识到,我刚告诉那大爷手机密码之后,手机密码已经被那大爷给改了。

于此同时,那老太太也在拿手机拍着我,说到:

”不行吧,不行就赶紧还给我们,你不还我就要报警了,我这可是录着像呢“

脑子里血气上涌,感觉要被气死了,心里骂着:”操他妈的,这是被坑了啊“,可是我还是想着先好好聊,就语气平稳但还是略带一点急躁的问他们要,让他们还给我。

突然,闹钟响了,突然把我从梦境中扯回到现实,可是我心里还是觉得很不爽,就赶紧把闹钟关了,试图再次进入这个梦里,我势必要把我的手机夺回来,我咽不下这口气!

可惜,续梦失败!

躺在床上的我回想着这场的梦,长舒一口气,感叹这还好只是场梦。

假如这不是梦,我又会不会后悔自己一个人走出电梯。

以前在微博上看到一个博主的视频,他们会组织演员去街头扮演一些弱势群体,看看路人的反应。比如腿脚不利索的大爷过马路,拐卖儿童的贩子等等,视频中总是会有热情的人愿意仗义相助。

我看的时候我就在想,假如我真的遇到这种情况,我是否会像他们一样,仗义相助呢?

从小接受的教育告诉我们,应该是要这么做的。

7.20暴雨日记

2021年7月20日,地处中原的郑州,刚经历了一场百年以来难得一遇的特大暴雨。

雨刚开始下的时候,还以为只是普通的一场大雨,我还跟朋友说不想去上班,但是拥有超高打工人觉悟的我还是去上了班。

哈哈哈,其实是因为这个月的假期已经用完,去上班只是为了不扣工资。

结果就是,直到下班的时候雨还在下,此时外边路面上的水已经快到膝盖了,地铁也已经停运,附近酒店也被订满,只剩下一些“天价房”。 还好可以留宿在朋友家,不然就只能住公司了。

21号一大早醒来,没水没电没信号,彷佛突然与外界隔绝了一样,郑州好像变成了一座没有互联网的城市。 可以联系上外界的时候,也是快到晚上了。雨中午已经停了,到晚上的时候小区路面已经很少水了。

在小区门口找到了一点微弱的信号,立马就给家里和朋友报了平安,免得他们太过担心,但是也只停留在可以打电话发短信的程度。

22号路面基本上已经没水了,我们几个失联群众步行去公司上班。 手机也在快到公司附近时来了信号,一大堆的信息和未接电话。

好像就是只有外边的人才知道郑州里边有多严重,我们在郑州里边好像没事人一样。

23号依旧没水没电,所以就早早来了公司蹭水蹭电。由于交通瘫痪,只有公司附近的人才能过来上班,所以公司人并不多。 由于是周五,再加上已经几天没回家了,就想着回去看看。 下班的时候地铁还没通,公交也要将近三个小时才能回去。 不过还好可以搭乘朋友的车,就跟他一起回家了。挺好的是,家里边已经开始有电有网了,水可能还要晚点才能来。

暴雨过后,这座城市变得一片狼藉,也有人不幸罹难,彷佛人类在大自然面前就像渺小的蚂蚁一样。 但是,一切正在努力恢复,它也正在慢慢变好。

暴雨冲刷了房屋街道,同时也冲刷了人们内心的浮躁。

珍惜眼前的小确幸!

半日偷闲,絮絮叨叨

马上就要六月了,代表着今年已经是过完小半年了。虽说夏天还没有正式的到来,可是外面的温度已经高达38℃了,这让人很难想象后面的天气会有多热。躲在空调冷风下的我,像往常周末一样,无聊的刷着短视频,手指不间断的向上滑动。可能是刷视频刷累了吧,突然想通过文字叨叨这半年。回头看这小半年,生活过得像往常一样琐碎忙碌,而且自己也没有干出来什么值得骄傲的成绩。好像也没什么可写的,那既然这样,干脆就写点琐碎吧,毕竟生活都是由琐碎的生活片段拼凑而成的。

最近正在看科幻小说《三体》,目前只看到大概一半吧,觉得网上对三体的评价果然不是吹的,就是刚开始的部分会让人觉得好像这不是一本科幻小说,如果继续看下去的话真的会觉得这本书真是宝藏。由于还没看完,也并不能对此作出过多的评价,就目前来说,他改变了我对科幻固有的认知,心中会不由得惊叹:“原来还可以这样!”,完全想不到下一页的剧情会是什么。

最近也有一件好玩的事,公司的一名翻译王同学,正在学习跟他的专业八竿子打不着的东西:数学和编程。问她为什么想要学习这些东西,她回答说:“我现在掌握的东西都太偏文科了,想学习一下理科的东西”。于是乎我就成了她的一个“老师”,她有时候有不会的问题也会向我请教,但是每次问的问题都很奇怪,有时候都不知道怎么回答,还有每次回答完他还会象征性的给我出五毛的劳务费。。。 真怕他问到我也不会的东西,回答不出来那岂不是很尴尬。

这半年下来我们IT部也离职了两个人,目前就剩下两个后端一个前端了,老板最近的打算是不招新人,这我也能理解,因为最近的工作的确不多,三个人足以应付的过来。在第一个跟我同时期来的人离职后,老板也专门找过我问我的情况,我也向他表态说了不会离职,同事也趁此机会向老板提了提加薪的事,最后也是如愿以偿。其实在这个公司两年左右的时间,工作的也蛮舒服的,虽说规模不大,但是却并没有乱七八糟的规章制度,这也是我选择继续留在这里的一部分原因。另外关于技术方面,最近半年除了维护一些旧项目以外,也在开发一个新的检索系统,技术上也不会是重复造轮子。

前段时间也看了一部超级好看的连续剧《觉醒年代》,是一部纪念建党一百周年的优秀电视剧展播。电影般的镜头光感、优秀的人物演绎。作为一个理科生,曾经在高一下学期就已经逃离历史的魔爪,所以我可以说是一个历史白痴。但是通过看这部剧,我好像更深入得了解了那段历史,那段我国优秀历史人物的光辉岁月。

今年三月份也搬了新家,因为之前一起住的两个朋友今年去别的地方发展了,再加上跟房东也不太合得来,就决定换一个地方住了,最后走的时候押金都没退。不得不说,郑州的租房市场似乎已经全被中介和托管占领了,想找一个房东直租的都要费好大劲,或者也可能是我们找的方式不对吧。另外,搬家真的很累很累!搬家之前是收拾东西,看着房间的东西觉得并没有多少,哪知道越收拾越多,三个人的东西客厅都占满了。到后来把东西搬到新家的时候,大包小包从一楼五楼,最后走路腿都是抖的,,,累坏我了。

现在记忆力也不太好,有些事情都已经忘记了,絮絮叨叨的写了一些琐碎的事情,记录这庸碌琐碎的小半年。在接下来的时间里,若是能摆脱一点这种庸碌的状态当然更好,若不能的话,那就这样吧,庸碌但能追求真实其实也挺好。

突然想到我的这个网站,已经挺久时间没有更新过文章了,本来给自己定的是一周更新一篇,现在看来也算是食言了。其实对于我个人而言,似乎很少通过文字来记录自己,可能是性格使然,对于生活中的心事经常苦闷心中然后慢慢消化,而对于有趣好玩的事情我也是一个人乐呵完之后就没有然后,手机上的日记同样也只是断断续续的更新;也可能是自认为文笔不行,写出来的东西连自己都觉得丢脸,又何必写出来让人取笑呢。好像文字对于我而言,似乎只是颜如玉与黄金屋吧。

爱上听鲸歌

不知道怎么回事,最近喜欢偷空听鲸鱼的叫声,声音空灵、纯静,可以让人紧绷的神经放松下来。很多次因为工作感到烦躁,亦或是晚上躺床上失眠的时候,都会打开手机听听鲸鱼的叫声,心境瞬间就平和下来了。

其实最开始听到鲸鱼的叫声是某短视频平台听到的,是一只座头鲸的叫声,刚听到的时候真的是让人惊艳且陶醉。于是就在网上寻找更多这样的声音,在搜索的过程中发现也有好多爱听鲸歌的,当然也有一些害怕听见鲸鸣的。

喜欢的人觉得这是一种心灵的洗礼,置身事外而又与世无争。害怕的人则大都是有深海恐惧症,深邃浩瀚仿佛置人于汪洋深海而又孤身一人。

一首最近经常听的歌:Whale sounds 2 hours,两个小时的鲸鱼叫声,欢快、希望、孤独尽在其中。

Run Elasticsearch by docker

1. Download the docker image of Elasticsearch, taking version 7.6.0 as an example

    docker pull elasticsearch:7.6.0

2. Create a container and run it.

if your command is:

   docker run -d --name es -p 9200:9200 -p 9300:9300 elasticsearch:7.6.0

It may exit shortly after starting. To find out the reason, view logs by log command:

   docker logs es

Some error message like max virtual memory areas vm.max_map_count [65530] is too low, increase to at least [262144] may appear. Go the following command:

   # change the variable
   sysctl -w vm.max_map_count=262144
   # check the variable value
   sysctl -n vm.max_map_count

If the error message is the default discovery settings are unsuitable for production use; at least one of [discovery.seed_hosts, discovery.seed_providers, cluster.initial_master_nodes] must be configured, which means the container has wrong configuration and can be corrected by setting those prompted environment variables or setting to standalone development mode by discovery.type=single-node.

In short, the correct command is:

   docker run -d --name es -p 9200:9200 -p 9300:9300 -e discovery.type=single-node elasticsearch:7.6.0

Using IK Chinese segmentation plugin.

1. Download the plugin.

The plugin version must equal the Elasticsearch version. Version 7.6.0 download link is https://github.com/medcl/elasticsearch-analysis-ik/releases/download/v7.6.0/elasticsearch-analysis-ik-7.6.0.zip

2. Unzip to an empty directory, which is referred to as *$IK*.

3. Copy the $IK into the directory of the container's plugin.

   docker cp $IK es:/usr/share/elasticsearch/plugins/ik

This plugin provides analyzer and tokenizer named ik_smart and ik_max_word where ik_smart splits by the coarsest granularity, while ik_max_word will exhaust all kinds of split combinations.

Find more info at IK.

Confession of a salted fish

Today, I listened to the sound of the drum all day that didn't stop till evening. So I was thinking whose child was training so hard. By contrast, I played all day, which made me feel guilty.

I wonder if I've done something like that. I wonder if I study in my spare time like that child. It seems very seldom.

Some time ago, I developed this website and wanted to use it to record my coding notes. However, after it was established, I have tossed it many times, such as changing the theme of the website, adding some new features, but have not focused on the content of the website and sticked to writing.

So I was wondering why I did this, why I developed this website at the beginning. It's just for me to take notes in my coding time. I found that I had violated my original intention.

Since I started working,taking notes and diary happened only occasionally. When I want to do that, I just do it in the beginning days, hardly to keep the impetus of that. Not only blogging, but aslo learning English. I have wanted to learn English many times, but I never sticked to it, so I don't learn English well, nor can I read computer documentation smoothly.

In the end, actually my main purpose of writing this blog is to practice my English, and also to reflect and spur myself,although it's all nonsense.

Fulltext retrieval with whoosh and Jieba

Environment dependencies

pip install django-haystack
pip install jieba
pip install whoosh

Environment configuration

Add this configuration in settings.py

INSTALLED_APPS = (
    'haystack',	#register fulltext searching framework
    )

#the configuration of fulltext searching
HAYSTACK_CONNECTIONS = {
    'default': {
    	# use the whoosh search engine
    	'ENGINE': 'haystack.backends.whoosh_backend.WhooshEngine',
    	# Specifies the default path of the index files generated by the index data corresponding to the keyword. When using the custom index file, write the custom file path here.
    	'PATH': os.path.join(BASE_DIR,'whoosh_index'), #  the file path of the index files.
    	}
}

# Auto generate indexes when add, change and delete data in database tables.
HAYSTACK_SIGNAL_PROCESSOR = 'haystack.signals.RealtimeSignalProcessor'

Create search_indexs.py in applications which need support searching.

from haystack import indexes
from apps.blog.models import Article


class ArticleIndex(indexes.SearchIndex, indexes.Indexable):
    text = indexes.CharField(document=True, use_template=True)

    def get_model(self):
        return Article

    def index_queryset(self, using=None):
        return self.get_model().objects.filter(status='p')

In the templates folder of the project, create folder structure like search/indexes/article/article_text.txt, where article is the lowercased model name.

# Specifies which fields in the table to index
{{ object.title }}	# index Title field
{{ object.body }}	# index Body field

Add search route

path('search', include('haystack.urls'), name='search'),

Add search form in the template.

<form action="/search" method="get">
            {% csrf_token %}
                <span id="searchAria" tabindex="0" onclick="searching()" onblur="offsearch()">
                    <input type="text" id="searchInput" style="display: none; border: none;" name="q">
                    <input type="submit" value="Search" style="border: none; display: none;" id="submitInput">
                    <a href="javascript:void(0);"  class="navPlugs"><i class="fa fa-search" aria-hidden="true"></i></a>
                </span>
</form>

tips: there must be an input tag whose attribute named name equals q in the form.

The following is the page of search results.

    <div class="jupe main-body">
        <ul class="post-list">
            {% if query and page.object_list %}
                {% for result in page.object_list %}
                    <li class="post-item">
                        <a class="post-title"
                           href="{{ result.object.get_absolute_url }}"
                           title="{{ result.object.title }}">{{ result.object.title | truncatesmart:34 }}</a>
                        <span class="post-time">{{ result.object.create_time | date:"Y.m.d" }}</span>
                    </li>
                {% empty %}
                    <p>Not found</p>
                {% endfor %}

                {% if is_paginated %}{% load_pages %}{% endif %}
            {% else %}
                <h3>Found nothing. Try to search by another keyword</h3>
            {% endif %}

        </ul>
    </div>

Build index

python manage.py rebuild_index

Configure Jieba Chinese Search

Because the default engine of whoosh doesn't support Chinese, u need to improve it.

Copy the default engine file \site-packages\haystack\backends\whoosh_backend.py to the project folder and rename it to whoosh_cn_backend.

Open it and import Jieba Chinese analyzer from jieba.analyse import ChineseAnalyzer.

Replace StemmingAnalyzer in the file with ChineseAnalyzer

Change the file path of search engine to custom path in settings.py

'ENGINE': 'apps.search.whoosh_cn_backend.WhooshEngine'

Rebuild index python manage.py rebuild_index

It supports Chinese search now.

OAuth2简述

什么是OAuth2

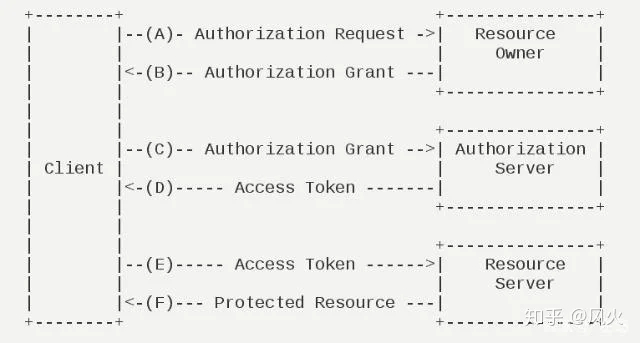
OAuth2是一个服务开放(授权)标准,它表示允许用户授权第三方应用访问该用户在另外一个服务器存储的用户信息,而不用将存储在该服务器的用户名以及密码或所有用户信息告知给第三方应用。

OAuth2的应用场景

当你想使用QQ登录的第三方应用时,此时第三方应用需要获取你的QQ信息(昵称、头像、openid等),但是又不能直接用户名和密码等信息。那么此时就需要你登录你的QQ服务器,然后授权给该第三方应用一部分信息。而OAuth2就是为了实现上述目标而制定的一种规范。

Oauth2的授权模式

  • 授权码(authorization code)
  • 隐藏式(implicit)
  • 密码式(resource owner password credentials)
  • 客户端凭证(client credentials)

授权码

授权码模式,指的是第三方应用先申请一个授权码,然后再拿着该授权码获取令牌。

img

  1. 用户访问第三方应用客户端,随后该客户端跳转到认证服务器,跳转的过程中附带上重定向URI。
  2. 用户在认证服务器给予授权之后,跳转到事先定义好的redirect_uri,并返回上一个授权码,该授权码是与当前客户端绑定的,无法被其他客户端使用。
  3. 客户端收到该授权码,携带上步骤1中的redirect_uri,向认证服务器申请令牌。请求成功后认证服务器会返回一个令牌,该令牌存在一个有效时间。
  4. 客户端拿到该令牌之后,将该令牌携带在请求中请求资源服务器,资源服务器判断该令牌的有效性,最终判断是否返回有效的资源信息。

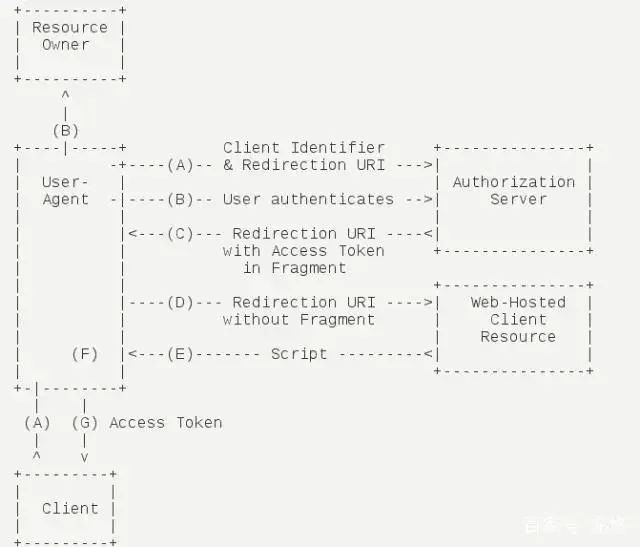
隐藏式

当有些网站时纯前端架构的时候,就无法通过后端来使用上述的授权模式了,令牌必须存在前端。该模式下不通过第三方应用的服务器,直接在浏览器里想认证服务器申请令牌,跳过了授权码的步骤。所有步骤都是在浏览器内完成,令牌对访问者是可见的,并且客户端不需要认证。

img

  1. 客户端在页面内放置一个链接,该链接指向认证服务器
  2. 用户点击授权,给该客户端授权
  3. 认证服务器在授权之后将跳转到客户端指定的redirect_uri,并将令牌包含在URI中,其中令牌并不是以查询参数的形式存储在URI中,而是以锚点的形式存储。
  4. 浏览器想服务器发起请求,资源服务器返回一个网页,网页内包含一个可以获取上述令牌的脚本
  5. 浏览器执行脚本,提取令牌,发送给客户端
  6. 客户端拿到令牌向资源服务器请求,资源服务器判断该令牌的有效性,最终判断是否返回有效的资源信息。

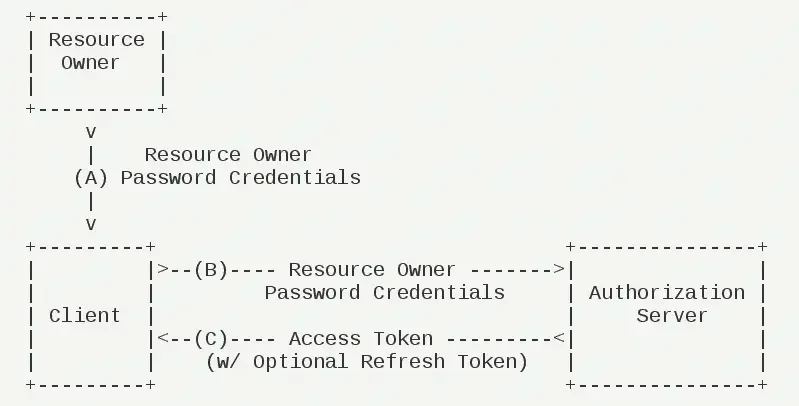
密码式

听名字我们就可以知道,该授权模式需要密码来进行。其实质是,如果你高度信任某个应用,那么可以直接告诉这个应用你的用户名和密码,然后该应用拿到这些信息去申请令牌。

img

  1. 用户向第三方应用提供用户名和密码
  2. 该应用将用户名和密码发送给认证服务器,然后请求令牌
  3. 认证服务器确认无误后,想客户端提供令牌
  4. 客户端拿到令牌向资源服务器请求,资源服务器判断该令牌的有效性,最终判断是否返回有效的资源信息。

客户端凭证

客户端凭证模式下,即是通过客户端的名义,而不是用户的名义去获取令牌。该模式下可以在纯后端进行,常见的参数有client_id、client_secret。

img

  1. 客户端向认证服务器发送一个携带client_id和client_secret的请求
  2. 认证服务器接收到客户端请求,并验证client_id和client_secret的有效性,如果有效这向客户端提供令牌。

What is JWT?

What is JWT?

JSON Web Token (JWT) is an open standard (RFC 7519) that defines a compact and self-contained way for securely transmitting information between parties as a JSON object. This information can be verified and trusted because it is digitally signed. JWTs can be signed using a secret (with the HMAC algorithm) or a public/private key pair using RSA or ECDSA. Although JWTs can be encrypted to also provide secrecy between parties, we will focus on signed tokens. Signed tokens can verify the integrity of the claims contained within it, while encrypted tokens hide those claims from other parties. When tokens are signed using public/private key pairs, the signature also certifies that only the party holding the private key is the one that signed it.

Application scenarios

Single Sign On

This is the most common scenario to use JWT. In a multi-system service architecture, after a user logged in to one system at first time, there is no need to log in repeatedly when using other systems.

Authorization

After a user logged in, every subsequent request contains JWT. When the JWT is verified, the user is allowed to access the resource he should access.

Components of JWT

JWT consists of three parts: Header, Payload, Signature, and they are connected with a dot.

  • The Header consists of two parts: the type of token and the signing algorithm being used, e.g. :
{
    'alg': "HS256",
    'typ': "JWT"
}
  • The Payload is actually a place to store valid information which has three types of claims.

Registered claims: Predefined claims which are not mandatory but recommended. Such as iss(issuer) and exp(expiration time)

Public claims: They can be defined at will.

Private claims: These are the custom claims created to share information between parties that agree on using them and are neither registered or public claims.

  • The Signature is a digital signature to prevent data from being tampered.

How is JWT generated

JWT is divided into three parts. How do these three parts come together to form a completed JWT?

  • The Header is encoded by base64 to get the first part.
  • The Payload is encoded by base64 to get the second part.
  • Through the algorithm in Header with a secret sign that encoded Header and encoded Payload and Connected with dot.

Tips: Jwt is not encrypted, so it's better not to store some sensitive information directly in JWT.

Workflow of JWT

After successful login for the first time, the user will get a JWT. This JWT is the certificate for the user to interact with the server, that is, the server uses this token to determine which user the requester is. When the user wants to access the resources on the server, the token was sent, which is usually placed in authorization, using bearer schema. For example:

Authorization: Bearer token

What are the advantages over traditional session authentication?

Session authentication

Because HTTP is a stateless protocol, we provide our user name and password for authentication when we first access it. Then, in the second visit, we still need to carry out a user authentication. Because according to the HTTP protocol, we don't know who the originator of the request is, in order to identify which user initiated the request, we can only save a copy of the user's information on the server, and then pass the same information to the user, so that the user can save it in cookies. In the next request, you only need to carry the information in the cookies. According to the submitted cookies, the server can determine which user it is. This is the traditional authentication based on session.

Problems in session based authentication

Session: after each user has been authenticated by our application, our application needs to make a record on the server to facilitate the authentication of the next request. Generally speaking, the session is saved in memory. With the increase of authenticated users, the cost of the server will increase significantly.

Scalability: after user authentication, the server makes authentication records. If the authentication records are saved in memory, it means that the next request of the user must be on this server, so that the authorized resources can be obtained. This also means that the expansion ability of the application is limited.

CSRF: because user identification is based on cookie, if cookie is intercepted, users will be vulnerable to cross site request forgery attack.

What are the advantages of JWT based authentication

  • Tokens are stored in the client, completely stateless and scalable.
  • Security: token is different from a cookie. Each request will send a token. Since no cookie is sent, it can also prevent CSRF attacks.

reference from https://jwt.io/introduction
MySQL创建用户和配置远程连接

创建远程连接用户

在某些情况下,可能别人需要连接你的数据库进行操作,出于安全考虑,我们需要新建一个用户,让该用户只具有一部分的操作权限操作数据库。

当然如果只有你一个人使用这个数据库的话,也可以跳过这一步,直接选择root用户来操作。

创建用户

使用help命令查看如何创建用户

help create user
Name: 'CREATE USER'
Description:
Syntax:
CREATE USER user_specification
    [, user_specification] ...

user_specification:
    user
    [
        IDENTIFIED BY [PASSWORD] 'password'
      | IDENTIFIED WITH auth_plugin [AS 'auth_string']
    ]

根据帮助说明,接下来我们来创建用户

create user 'zjc'@'localhost' # 创建一个用户zjc,不需要密码即可登录,但只可以在本机登录
create user 'zjc'@'%'	# 创建一个用户zjc,不需要密码即可登录,可以在任意主机登录
create user 'zjc'@'%' identified by '123456'	# 创建一个用户zjc,登录时需要密码123456才可以登录,会自动将密码加密
create user 'zjc'@'%' identified by password '123456' # 创建一个用户zjc,登录时需要密码123456才可以登录,会将密码明文存储

修改密码

命令:

set password for 'username'@'host' = PASSWORD('newpassword');

查看帮助命令查看详情

> help set password
Name: 'SET PASSWORD'
Description:
Syntax:
SET PASSWORD [FOR user] =
    {
        PASSWORD('cleartext password')
      | OLD_PASSWORD('cleartext password')
      | 'encrypted password'
    }


修改密码:

set password for 'zjc'@'%' = PASSWORD("654321")

删除用户

命令:

drop user username

用户授权

查看用户目前的权限

> show grants for zjc;
+---------------------------------+
| Grants for zjc@%                |
+---------------------------------+
| GRANT USAGE ON *.* TO `zjc`@`%` |
+---------------------------------+

USAGE相当于一个占位符,表示目前zjc用户什么权限都没有,需要我们给他授予权限

授权该用户权限

命令:

grant privileges ON databasename.tablename to 'username'@'host'

同样使用help命令详情

> help grant
Name: 'GRANT'
Description:
Syntax:
GRANT
    priv_type [(column_list)]
      [, priv_type [(column_list)]] ...
    ON [object_type] priv_level
    TO user_specification [, user_specification] ...
    [REQUIRE {NONE | ssl_option [[AND] ssl_option] ...}]
    [WITH with_option ...]

GRANT PROXY ON user_specification
    TO user_specification [, user_specification] ...
    [WITH GRANT OPTION]

object_type:
    TABLE
  | FUNCTION
  | PROCEDURE

priv_level:
    *
  | *.*
  | db_name.*
  | db_name.tbl_name
  | tbl_name
  | db_name.routine_name

user_specification:
    user
    [
        IDENTIFIED BY [PASSWORD] 'password'
      | IDENTIFIED WITH auth_plugin [AS 'auth_string']
    ]

ssl_option:
    SSL
  | X509
  | CIPHER 'cipher'
  | ISSUER 'issuer'
  | SUBJECT 'subject'

with_option:
    GRANT OPTION
  | MAX_QUERIES_PER_HOUR count
  | MAX_UPDATES_PER_HOUR count
  | MAX_CONNECTIONS_PER_HOUR count
  | MAX_USER_CONNECTIONS count

  • privileges:用户的操作权限,如SELECT,INSERT,UPDATE等,如果要授予所的权限则使用ALL
  • databasename:数据库名
  • tablename:表名,如果要授予该用户对所有数据库和表的相应操作权限则可用表示,如.*

给用户zjc授予权限

grant all on *.* to 'zjc'@'%';	

刷新权限

flush privileges;

取消该用户的权限

命令:

revoke privilege ON databasename.tablename FROM 'username'@'host';

help查看详情

> help revoke
Name: 'REVOKE'
Description:
Syntax:
REVOKE
    priv_type [(column_list)]
      [, priv_type [(column_list)]] ...
    ON [object_type] priv_level
    FROM user [, user] ...

REVOKE ALL PRIVILEGES, GRANT OPTION
    FROM user [, user] ...

REVOKE PROXY ON user
    FROM user [, user] ...

说明:同上面的授权部分

配置远程链接

找到配置文件中的[mysqld]一项

# this is only for the mysqld standalone daemon
[mysqld]

#
# * Basic Settings
#
user                    = mysql
pid-file                = /run/mysqld/mysqld.pid
socket                  = /run/mysqld/mysqld.sock
#port                   = 3306
basedir                 = /usr
datadir                 = /var/lib/mysql
tmpdir                  = /tmp
lc-messages-dir         = /usr/share/mysql
#skip-external-locking
skip-name-resolve

# Instead of skip-networking the default is now to listen only on
# localhost which is more compatible and is not less secure.
# bind-address            = 127.0.0.1

bind-address 注释掉,,然后重启数据库即可

systemctl restart mysql

问题记录

我在尝试用 navicat连接的时候,出现(2013,XXXXXXXX)的错误,这样是由于mysql在接收到客户端链接的时候需要对dns进行反向解析,由于我实在局域网内,所有反向解析是不可能成功的。

解决办法有两种:

  1. 把client的ip写在mysql服务器的/etc/hosts文件里,随便给个名字就可以了。
  2. 在 my.cnf 中加入 skip-name-resolve

于第一种方法比较笨,也不实用,那么 skip-name-resolve 选项可以禁用dns解析,但是,这样不能在mysql的授权表中使用主机名了,只能使用IP。

什么是mysql的dns反解析

mysql接收到连接请求后,获得的是客户端的ip,为了更好的匹配mysql.user里的权限记录(某些是用hostname定义的)。

如果mysql服务器设置了dns服务器,并且客户端ip在dns上并没有相应的hostname,那么这个过程很慢,导致连接等待。

官方解释

How MySQL uses DNS When a new thread connects to mysqld, mysqld will spawn a new thread to handle the request. This thread will first check if the hostname is in the hostname cache. If not the thread will call gethostbyaddr_r() and gethostbyname_r() to resolve the hostname. If the operating system doesn’t support the above thread-safe calls, the thread will lock a mutex and call gethostbyaddr() and gethostbyname() instead. Note that in this case no other thread can resolve other hostnames that is not in the hostname cache until the first thread is ready. You can disable DNS host lookup by starting mysqld with –skip-name-resolve. In this case you can however only use IP names in the MySQL privilege tables. If you have a very slow DNS and many hosts, you can get more performance by either disabling DNS lookop with –skip-name-resolve or by increasing the HOST_CACHE_SIZE define (default: 128) and recompile mysqld. You can disable the hostname cache with –skip-host-cache. You can clear the hostname cache with FLUSH HOSTS or mysqladmin flush-hosts. If you don’t want to allow connections over TCP/IP, you can do this by starting mysqld with –skip-networking.

根据文档说明,如果你的mysql主机查询DNS很慢或是有很多客户端主机时会导致连接很慢,由于我们的开发机器是不能够连接外网的,所以DNS解析是不可能完成的,从而也就明白了为什么连接那么慢了。同时,请注意在增加该配置参数后,mysql的授权表中的host字段就不能够使用域名而只能够使用 ip地址了,因为这是禁止了域名解析的结果。

Linux中的软链接和硬链接

Linux文件系统

在 UNIX 系统中,操作系统为磁盘上的文本与图像、鼠标与键盘等输入设备及网络交互等 I/O 操作设计了一组通用 API,使他们被处理时均可统一使用字节流方式。

换言之,UNIX 系统中除进程之外的一切皆是文件,而 Linux 保持了这一特性。为了便于文件的管理,Linux 还引入了目录(有时亦被称为文件夹)这一概念。目录使文件可被分类管理,且目录的引入使 Linux 的文件系统形成一个层级结构的目录树。

Linux 系统的顶层目录结构

/              根目录
├── bin     存放用户二进制文件
├── boot    存放内核引导配置文件
├── dev     存放设备文件
├── etc     存放系统配置文件
├── home    用户主目录
├── lib     动态共享库
├── lost+found  文件系统恢复时的恢复文件
├── media   可卸载存储介质挂载点
├── mnt     文件系统临时挂载点
├── opt     附加的应用程序包
├── proc    系统内存的映射目录,提供内核与进程信息
├── root    root 用户主目录
├── sbin    存放系统二进制文件
├── srv     存放服务相关数据
├── sys     sys 虚拟文件系统挂载点
├── tmp     存放临时文件
├── usr     存放用户应用程序
└── var     存放邮件、系统日志等变化文件

Linux 与其他类 UNIX 系统一样并不区分文件与目录:目录是记录了其他文件名的文件。使用命令 mkdir 创建目录时,若期望创建的目录的名称与现有的文件名(或目录名)重复,则会创建失败。

硬链接与软链接的联系与区别

我们知道文件都有文件名与数据,这在 Linux 上被分成两个部分:用户数据 (user data) 与元数据 (metadata)。用户数据,即文件数据块 (data block),数据块是记录文件真实内容的地方;而元数据则是文件的附加属性,如文件大小、创建时间、所有者等信息。在 Linux 中,元数据中的 inode 号(inode 是文件元数据的一部分但其并不包含文件名,inode 号即索引节点号)才是文件的唯一标识而非文件名。文件名仅是为了方便人们的记忆和使用,系统或程序通过 inode 号寻找正确的文件数据块。

在 Linux 系统中查看 inode 号可使用命令 stat 或 ls -i(若是 AIX 系统,则使用命令 istat)。

 # stat /home/harris/source/glibc-2.16.0.tar.xz
 File: `/home/harris/source/glibc-2.16.0.tar.xz'
 Size: 9990512      Blocks: 19520      IO Block: 4096   regular file
Device: 807h/2055d      Inode: 2485677     Links: 1
Access: (0600/-rw-------)  Uid: ( 1000/  harris)   Gid: ( 1000/  harris)
...
...
# ls -i -F /home/harris/Desktop/glibc.tar.xz
2485677 /home/harris/Desktop/glibc.tar.xz

为解决文件的共享使用,Linux 系统引入了两种链接:硬链接 (hard link) 与软链接(又称符号链接,即 soft link 或 symbolic link)。链接为 Linux 系统解决了文件的共享使用,还带来了隐藏文件路径、增加权限安全及节省存储等好处。若一个 inode 号对应多个文件名,则称这些文件为硬链接。换言之,硬链接就是同一个文件使用了多个别名(见 图 2.hard link 就是 file 的一个别名,他们有共同的 inode)。硬链接可由命令 link 或 ln 创建。

创建硬链接

link oldfile newfile
ln oldfile newfile

查找有相同 inode 号的文件

df -i --print-type

由于硬链接是有着相同 inode 号仅文件名不同的文件,因此硬链接存在以下几点特性

  • 文件有相同的 inode 及 data block;
  • 只能对已存在的文件进行创建;
  • 不能交叉文件系统进行硬链接的创建;
  • 不能对目录进行创建,只可对文件创建;
  • 删除一个硬链接文件并不影响其他有相同 inode 号的文件。

硬链接不能对目录创建是受限于文件系统的设计。现 Linux 文件系统中的目录均隐藏了两个个特殊的目录:当前目录(.)与父目录(..)。查看这两个特殊目录的 inode 号可知其实这两目录就是两个硬链接。若系统允许对目录创建硬链接,则会产生目录环。

软链接与硬链接不同,若文件用户数据块中存放的内容是另一文件的路径名的指向,则该文件就是软连接。软链接就是一个普通文件,只是数据块内容有点特殊。软链接有着自己的 inode 号以及用户数据块。因此软链接的创建与使用没有类似硬链接的诸多限制:

  • 软链接有自己的文件属性及权限等;
  • 可对不存在的文件或目录创建软链接;
  • 软链接可交叉文件系统;
  • 软链接可对文件或目录创建;
  • 创建软链接时,链接计数 i_nlink 不会增加;
  • 删除软链接并不影响被指向的文件,但若被指向的原文件被删除,则相关软连接被称为死链接(即 dangling link,若被指向路径文件被重新创建,死链接可恢复为正常的软链接)。

创建软连接

ln -s 源文件路径 目标路径

我们尝试对不存在的文件创建软连接

# ls -li
 total 0

 // 可对不存在的文件创建软链接
 # ln -s old.file soft.link
 # ls -liF
 total 0
 789467 lrwxrwxrwx 1 root root 8 Sep  1 18:00 soft.link -> old.file 

 // 由于被指向的文件不存在,此时的软链接 soft.link 就是死链接
 # cat soft.link 
 cat: soft.link: No such file or directory 

 // 创建被指向的文件 old.file,soft.link 恢复成正常的软链接
 # echo "This is an original file_A" >> old.file
 # cat soft.link
 This is an original file_A

 // 对不存在的目录创建软链接
 # ln -s old.dir soft.link.dir
 # mkdir -p old.dir/test
 # tree . -F --inodes
 .
├── [ 789497]  old.dir/
│   └── [ 789498]  test/
├── [ 789495]  old.file
├── [ 789495]  soft.link -> old.file
└── [ 789497]  soft.link.dir -> old.dir/

当然软链接的用户数据也可以是另一个软链接的路径,其解析过程是递归的。但需注意:软链接创建时原文件的路径指向使用绝对路径较好。使用相对路径创建的软链接被移动后该软链接文件将成为一个死链接,因为链接数据块中记录的亦是相对路径指向。